
Loading a Truck
Loading a Truck: Two main concepts: (1) Splitting demand from items used to fulfill that demand. (2) Using a Flexibatch Block to combine items in random quantities.
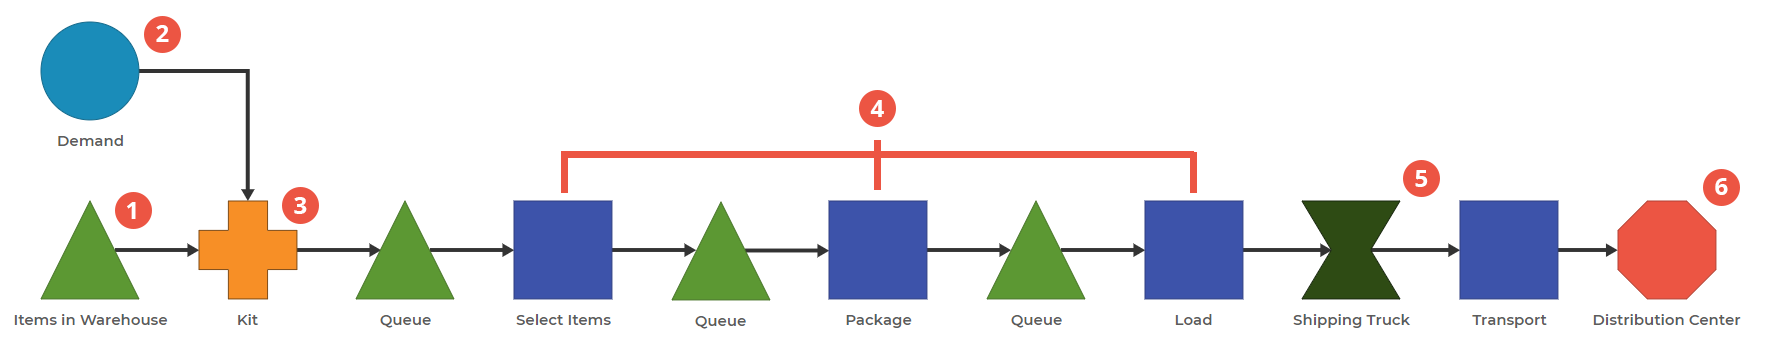
0. This model has nine items. Large Item in Inventory, Large Item Order, Large Item (made up of 1 Large Item Order and 1 Large Item in Inventory), Small Item in Inventory, Small Item Order, Small Item (made up of 1 Small Item Order and 1 Small Item in Inventory), Mulitple Item in Inventory, Multiple Item Order, and Multiple Item (made up of 1 Multiple Item Order and 4 Multiple Items in Inventory).
1. Store Items in the Warehouse. This model separates the items that are in demand from the demand coming in. Add each "in Inventory" item to this block and set the Initial on Hand to the number stored in the Warehouse.
2. Create Demand for the Items. Add each "Order" item to this block and set the demand distribution.
3. Kit the Order with the Items in Inventory. In this block, add the 3 "Item" item types. When creating each of these compound items in the Items Menu, ensure that your "in Inventory" items are classified as "Wait to Pull." This will keep them in the warehouse until an order comes in.
4. Set unique processing times in Select Items, Package, and Load. In Select Items, all items have unique parameters. In Package, only the Multiple Item type has unique parameters (the other two use the default). In Load, only the Large Item type has unique parameters.
5a) - Creating a Truck using a Flexibatch. The Flexibatch operates on "Equivalent Units," corresponding to some measurement that employees can use. There is a minimum and a maximum for Equivalent Units; for a truck, you might consider "volume" the metric of concern. The minimum is the fewest cubic inches that can fill the truck before driving off. The maximum is the number of cubic inches that can be filled in an entire truck. Let's set the minimum to 180 and the maximum to 200.
5b) - Wait for additional items. The "Wait for Additional Items" parameter will indicate how long a "truck" will wait for other items after it reaches its minimum. In this case, we're willing to wait 30 minutes for additional items. If you want to wait until the truck reaches its maximum before departing, just set this parameter to much longer than expected. The truck will depart immediately once it reaches the maximum.
5c) - Add Equivalent Units per Item. Add "Large Item," "Small Item," and "Multiple Item" to this Flexibatch Block. Under each item, the parameter "Item's EUs" is the specific amount each item takes up. Since the truck is defined as having 200 units to indicate volume, we'll set "Large Items" to be 10 EUs, Small Items to be 1 EU, and Multiple Items to be 2 EUs. The truck can hold 20 Large Items, 200 Small Items, 100 Multiple Items, or any combination of those.
6. After transporting, unbatch at the Distribution Center. Turning Unbatch Items on means the items, not the truck, will appear in the Distribution Center block.
This model highlights two tools to add to your toolbelt. The first is the concept of splitting demand and items that fulfill that demand. In some cases, it may be appropriate to just use the Demand Block; in other cases, this "Demand and Kit" concept may make more sense.
The second is the Flexibatch Block, which creates a batch with different numbers of items based on a minimum and maximum of Equivalent Units. This allows you to define a few parameters, but the batches are based on the model itself, not your specific recipe.
Was this helpful?