
Blocks Tutorial
Blocks, or shapes, are the building blocks of a simulation model. You can find them on the left side of your screen.
Drag and drop blocks from this panel to add them to your model.
If you would like to hide the blocks panel, you can do so by clicking the Block Selection icon at the top left of the toolbar.

Show and hide the blocks panel by clicking this icon.
To add a block to your model, simply click on the shape and drag it into your model workspace. You may notice that your screen shows a white page in the center of the workspace. Don't worry about restricting your model to this space. You can always drag blocks off the edge of the white space, and Process Playground will automatically expand your workspace and add more white pages.
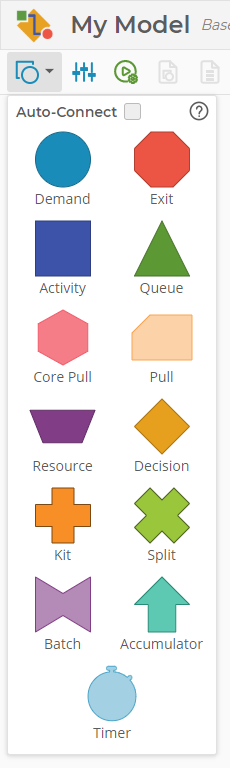
Each of these blocks provides different functions you may need in building your simulation model. Below is a quick overview of each block, as well as a link to a more detailed description of its functions:
- Demand Block: The Demand Block allows you to add a demand source to your simulation model. Each Demand Block can add one or more independent demand streams to your model.
- Exit Block: The Exit Block represents the end of your process. While you could also use a Queue Block to represent an exit, the Exit Block makes it explicit.
- Activity Block: The Activity Block represents any activity or task performed as part of the process. In addition to specifying the time required to complete a task, the Activity Block also manages the various flow pathways allowed for different items in your model.
- Queue Block: The Queue Block creates a queue or buffer in your process. There are several options for managing the behavior of the queue, which also can be used to direct the flow of items in your model.
- Core Pull Block: The Core Pull Block allows you to specify a range of blocks in the model to be managed as a core process pull system.
- Pull Block: The Pull Block provides the functionality required to implement a traditional Lean pull system. It offers the basic functions of a queue, with the added ability to trigger replenishment orders based on parameters entered in the block.
- Resource Block: The Resource Block allows you to create a pool of resources you can then assign to one or more Activity Blocks in your model. You might use a Resource Block to create a labor pool shared among several activities or to organize different levels of resources that are available during different time periods during the day.
- Decision Block: The Decision Block allows you to create a decision point in your model. You can branch based on preset probabilities or whichever Decision Block path that has the shortest queue of items waiting.
- Kit Block: The Kit Block acts as a queue and is used to assemble multiple items to create a new item. In a manufacturing setting, this block could be used to represent assembly or mixing steps. In a service-sector setting, this block could assemble the multiple pieces of information that go into a loan application and approval process.
- Split Block: The Split Block is used to disassemble an item into other items.
- Batch Block: The Batch Block creates groups of the same item. The Batch Block acts like a queue, collecting items until the minimum batch size is reached, at which point items are grouped as a batch and continues through the simulation. If you want to separate a batch into its original items, you can use a Queue Block to unbatch it.
- Accumulator Block: The Accumulator Block creates an item-level parameter that allows different blocks to add a user defined amount as it passes through. For example, this can be used for accumulating cost to an item or counting rework loops through a queue.
- Timer Block: The Timer Block creates an item-level parameter that reflects the amount of time between when an item enters one block and leaves another block.
Was this helpful?